DIY All Natural Hairspray

IMAG3224
I have to use Hairspray since I permed my hair, and I was using a normal Hairspray I bought from a grocery store.

I thought hairspray is the artificial chemical product that I could not escape from. But I kept thinking about the artificial chemicals I inhaled from the hairspray, and my hair was coated with a layer of chemicals…and this hairspray would touch my face through my hair and remain chemicals on my face.

Why is hairspray bad for health?

  • Hair spray contains chemicals that can be bad for health.
  • The ingredients in hairspray can sometimes cause allergic reactions, such as sneezing and skin reactions.
  • Long term usage can cause lung disorder contracted by inhaling and accumulating small particles in the body.

I found a few natural recipes for hairspray: 

  1. Salt and water
  2. Sugar and Water
  3. Lemon and Water

I decided to try making my Lemon & Lavender Hairspray!

It’s easy! And it is cheap!

What you need are:IMAG3210

  • 1 lemon/ orange
  • 2 cup of water
  • ¼ cup of Vodka or Gin (as a preservative)
  • 8-10 drops of essential oil of your choice (Optional) (As usual…I use Lavender oil)

Instructions: 

  1. Cut the lemon/ orange into pieces
  2. Boil it with 2 cups of water until water reduce into 1 cup.
    IMAG3213
  3. Filter the lemon water into the measuring cup. (Only water should reminds in the cup)
  4. Wait until the water becomes cool (I put it into iced water to cool it down faster).
    IMAG3219
  5. Add Alcohol and essential oils into the cup of lemon water.
  6. Use a funnel to pour the mixture into a spray bottle. Shake will before each use.
    IMAG3221

I have been using this hairspray for few weeks now, and my hair feels excellent!

My hair no longer coated with a layer of artificial chemicals and the only thing my hair smells are Lemon and Lavender (and my hair is a little bit drunk because of the Vodka, haha)!

Notes:

  • This natural hairspray gives me a very natural hold! If you want to have a stronger hold, you can try to add more lemon or orange into the recipe!
  • Because lemon is a natural bleach, there is a chance the lemon can lighten your hair when exposed to sunlight. You can use an orange for darker hair and use lemon if your hair has light color.

Homemade All Natural Lip Balm

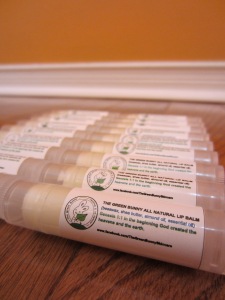
IMG_6945

The Green Bunny Homemade All Natural Lip Balm

Lip balm is essential in my purse, I like keeping my lips moist and juicy (haha :P). But do you know a lot of lip balms use petroleum as their base ingredient?

Why petroleum is not good?

  • There are no real hydrating benefits.
  • It only seals in moisture to the lips.
  • It stops the skin of the lips from breathing while sealing in bacteria
  • Petroleum only coat for skin/lips that it will not be absorbed.
  • By locking moisture against the skin, mineral oil sits on the skin’s surface and can potentially block pores. This may cause the appearance of pimples because the skin cannot ‘breath’.
  • It’s only a short term solution for dry skin. And in long run, it can make your lips more chapped.
  • Petroleum is made from fossil fuels, using petroleum products means using more fossil fuels
  • It’s only popular with manufacturers because they are cheap

I used the shea butter base moisturizer as my lip balm, and I store it in a sample size container. Because it’s shea butter base, the texture will change depends on the temperature and it melts when it’s hot.

I always wanna try to make lip balms in tubes because it’s easier to put on lips and I don’t have to clean my hands before I put it on! =P

This is my first time making lip balms in tubes for my church fundraiser, and I made around 50 tubes!

Recipe for making around 20 tubes

Ingredients:

From left to right: Lavender Oil, Vitamin E Oil, Almond Oil, Beeswax, Shea Butter

From left to right: Lavender Oil, Vitamin E Oil, Almond Oil, Beeswax, Shea Butter

  • 2 tbs Beeswax
  • 2 tbs Shea Butter (I tried using 1 tbs Cocoa butter and 1 tbs Shea butter)
  • 4 tbs Almond Oil (You can use other type of oil)
  • ¼ tsp Vitamin E oil (Optional, I added it just to make it more luxury)
  • ¼ tsp Essential Oil of your choice (I tried using Lavender Oil and Grapefruit Oil separately)

Preparation:

  1. For people like me, who doesn’t have a double boiler, I used a regular pot to boil water and place a bowl in the pot in low heat.
  2. Place tubes in a container and use paper towel to keep tubes stay well.
    IMG_6833

Directions:

1. Melt beeswax in the double boiler or the bowl.
IMG_6839
2. Add Shea Butter, Almond Oil and Vitamin E oil into the melted beeswax.
IMG_6840
3. Keep stirring with a whisk.

4. Remove from heat once everything melted.

5. Whisk in essential oils.

6. Transfer the liquid to a measuring cup or a container with a pour spout and pour it into lip balm tubes.
IMG_6841
7. Wait for the lip balms to become solid.
IMG_6843

8. Enjoy your all natural homemade lip balms!
IMAG3275

Tips:

  • I found that the mixture cools down and turns into solid so fast.
  • Once mixture cools down and turns into solid while you are pouring, you have to reheat and melt the mixture again…that’s annoying and time consuming.
  • I decided to use the measuring cup as the container when I was melting and mixing ingredients. It skips the step for transferring from one container to another.

If you are interested in buying The Green Bunny Homemade and natural lip balm, please visit The Green Bunny Fan page!

The Green Bunny

People who are following my blog know that I have been making my own products for almost a year. When my friends heard about what I have been doing, they are interested in the DIY products and they asked me why didn’t I sell it.

At first I thought the idea of selling my products is not practical, I thought that if I can make it, everyone can make it. But more and more people suggested me, so I decided to start selling my products and started “The Green Bunny” project.

The purpose of starting “The Green Bunny” is not for doing a business, but to create awareness abut protecting our environment by using or making eco-friendly products. By using and making natural products, we can reduce the amount of artificial chemicals we use in our daily life, which means that we and the environment will absorb less artificial chemicals and become healthier.I really hope that people can make their own skin care products, but if they think it it too complicated to make it, they are always welcome to try “The Green Bunny” products!


If you are interested in “The Green Bunny”, please visit  the Fan Page!

It is so glad that I had a chance to be part of the MCPC Coffee House Fundraiser. And it was such a blessing that I can sell my products in my church for fund raising and supporting the short term mission.We had a fun night, with all the yummy baked goods, coffee and drinks, and there were people performing, singing, dancing and sharing about their passion! And I had a chance to explain the purpose of my products.

IMAG3308

IMAG3317

IMAG3319


A.C.C.L.T. Salad with lemon juice, basil, honey, gapeseed oil dressing

It’s my first time using my fresh basil from my tiny garden!!!

IMAG3187

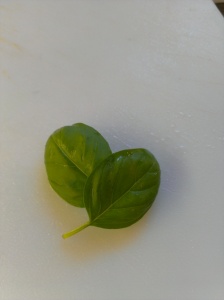
Hi there!!! I am so excited about picking the fresh basil leaves off from my tiny herb garden!!! And  the first dish I made is…A.C.C.L.T. Salad!

What is A.C.C.L.T??? (Obviously, I made this name up!)                  IMAG3185

Avocado
Carrot
Cucumber
Lettuce
Tomato

Dressing

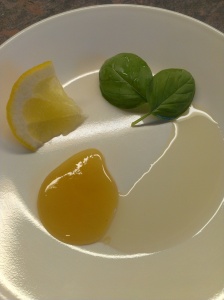
IMAG3189

Lemon Juice/lime juice
Fresh Basil
Honey
Grape seed Oil

You can add other herbs to add more flavors in your salad and I tried adding Mint, it was very refreshing and yummy!

Direction:

Mix minced basil and other herbs of your choice with lemon juice/lime juice, honey and grape seed oil.

You can add a little bit of water to make it easier to mix everything well.

IMAG3190

Mixture of the dressing

It’s simple and yummy, also very refreshing for the hot summer!

IMAG3192
Hope you can enjoy your summer with refreshing and yummy salad!

My Tiny Herb Garden

IMAG3088 IMAG3086

Maybe you have no idea how random and not well-planned I am but perhaps you can get some idea from what happened last Sunday.

After fellowship on Sunday, Mr. E and I went to Square One to return something. We passed by Dollarama on our way, and I suggested to go inside and check out the summer stuff!

All of a sudden,

ME: “So…how about we can plant something? Like herbs?”
E: “OK”
ME: “Let’s look for pot and herb seeds!”

That’s how my idea started!!!!!

I started a TO BUY LIST…that came out maybe just within a minute after we entered the store….

  1. A long rectangle pot that we can plant different kinds of herbs
  2. Seeds
  3. Soil

Mr. E was not surprised by my “all of a sudden project”, and he started helping me to find stuff!!!! We found a long plastic pot for $2, but we couldn’t find herb seeds, so I suggested going to Walmart to check out seeds and soil!

We couldn’t find a big selection of herb seeds, so my plan got changed! We started looking for herbs in the Gardening and plants section!!!

As I mentioned, this plan just popped up from my mind all of a sudden, so I didn’t do any research on herbs and I didn’t even know what should grow together or not. And I wasn’t even planned to write a blog about it, so I didn’t take any pictures while I was preparing. Haha

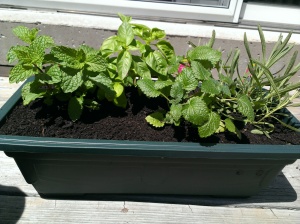
I decided to plant Lavender, Lemon Balm, Sweet Basil, and Mint in my pot!!! (I bought them for $2.95 each from Walmart)

You can click on the hyperlink to see profiles of different herbs from Bonnie Plants.

The combination of herbs is not too bad, since Lemon Balm, Basil and Mint grow in similar condition, but I noticed Lavender needs more moist soil then the others. But it was already too late, hope they can grow well and grow happily together!!!

After doing some research while I was buying soil and asked the sales person for advise, we decided to buy Composed Cow Manure (15kg for $2.44) and top soil (20L for $1).

Top soil and composed cow manure

Top soil and composed cow manure

Preparation:

  • Make sure the pot has holes in the bottom for good drainage.

    • If your pot does not have holes in the bottom (just like mine), you can drill some holes in the bottom of the pot.
  • Add gravels into the container as the bottom layer to help water drain out from the bottom of the soil.

    • I missed this part! I knew it after everything was done! XD
  • Mix composed cow manure and top soil with the ration of 4:6.
  • Add mixed soil into the pot.
  • Transplant your plants from the original pot to the NEW pot.

    • The herbs I got from Bonnie Plants are grew in biodegradable pots, so I didn’t have to worry about anything.
    • BUT if yours are in plastic pots, remember to remove the plants from the pots carefully without hurting the roots.
  • Fill in soil around the planted herbs and pat soil on top of the soil that came with the plants.
  • Some websites suggested to press the surrounded soil firmly, but from my previous experience, I was pressing too hard and made it harder for water drain from the top to the bottom of the soil.
From left to right: Mint, Basil, Lemon Balm, Lavender

From left to right: Mint, Basil, Lemon Balm, Lavender

It is not something hard to make. Growing some herbs in your kitchen or patio can add some green in your household, and MOST IMPORTANTLY~~~YOU CAN HAVE CHEAPER HERBS FOR COOKING (or drinking)!!! (yeahhhh!)

IMAG3089

Close up of Mint

I am happy with my tiny herb garden and I am thinking to enlarge my garden by adding more pots filled with herbs!!!!

And here are some ideas for all natural fertilizers I am planning to use!!!

  • Dried coffee grounds
  • Egg shell
  • Dried tea leaves
  • Coffee water to spray onto the herbs

DIY EYE CREAM

I used to buy different kinds of eye creams from $15 to $100 or more…because I have puffy eyes and dark circles and they always bother me a lot.

Since last year, I stopped using eye creams after making my DIY moisturizer. I have already made 4 jars of moisturizers with different recipes (that I can share in the future) and I think my moisturizers are good enough that I do not need eye creams anymore.

Since I am used to the idea of skin care products that require multiple steps: Toner, eye cream, serum, and moisturizer…

I decided to go back to Skin Care Step 1, 2, 3 (I still think my DIY moisturizer is good enough that I don’t need serum), but this time, I want to make everything by myself!!!!

And today, I wanna share my DIY eye cream experience with you!

Ingredients: rose water, borax, apricot oil, almond oil, bee-wax and lavender oil

Ingredients: rose water, borax, apricot oil, almond oil, beeswax and lavender oil


Ingredients:

  • Mixture A:
    3 tsp almond oil
    3 tsp apricot oil
  • 1 tsp beeswax
    -it’s hard for me to find beeswax, and the lady I spoke to who owns a bee farm suggested me to use a 100% pure beeswax candle and melt it for beeswax-
  • 5 tsp rose water
  • ¾ tsp borax
  • 5 drops essential oil of your choice (and as usual I use lavender oil)

 Instructions:

  1. Put Mixture A into a small saucepan and heat the mixture over low heat until everything melts
  2. Remove from heat, mix it and blend it well
    If you have only one saucepan, you can keep mixture A in another container-

    Stirred bee wax + oils

    Stirred beeswax & oils (Mixture A)

  3. Put Rose water in the sauce pan over very low heat
  4. Mix borax into rose water until the borax is dissolved, remove from heat
  5. Place container with Mixture A with iced towel (or into an ice bath)
  6. Stir Mixture A while pouring in rose water and borax mixture
  7. Mixture will turn into a creamy form
  8. Add essential oil when the eye cream is cool
  9. Put the finished eye cream into container

    Da~da~!

    Da~da~!


I enjoy this eye cream a lot! I can’t tell you if it really reduces my dark circles or puffiness, because I have just been using it for a week.

But it provides a lot of moisture and has smoothen the skin around my eyes.

I started wondering why I spent so much money on eye cream when I can make my own. Companies and brands are over charging us and using chemicals or “high technology” to help us to reduce fine lines, puffiness and dark circles. It may solve skin problems in the short term, but underneath the pretty skin, chemicals accumulate, and skin is not as healthy as it should be.

Using something natural and cheap, we can have the same result of having smooth and bright skin around your eyes!

Why not give it a try today and have natural beauty that’s cheap without any chemicals?

DIY Coffee Grounds Exfoliator/ Body Scrub

We drink coffee in the morning to wake ourselves up, but don’t you know that coffee can also wake our skin up?

IMAG1997

My lovely espresso machine!

The caffeine in coffee helps improving blood circulation and stimulates the movement of water through your body.

So here are some benefits of Caffeine for our skin:

  • Improving blood circulation and stimulates the movement of water through your body
  • Reducing redness and inflammation
  • Reducing the appearance of under-eye circles
  • Getting rid of cellulite.
  • Even Skin tones
  • Smoothing skin
  • Firming skin
  • Preventing acne
  • Reducing the appearance of fine lines, cellulite
IMAG2219

Grounded Coffee

I have been making DIY exfoliator for both face and body, I can say the ingredients for body scrubs and face exfoliator is the same, so it can be used all over your body, head to toe!

There are a lot of recipes on the Internet, and maybe you already noticed, I like playing around with ingredients and create my own receipts.

Ingredients of Body Scrub/Face exfoliator:

  • One table spoon of coffee grounds
  • One table spoon of green bean powder/ green tea powder
  • One table spoon of honey
  • Few drops of Oil of your choice (Avocado oil/ Olive oil/ Grapeseed Oil/ Apricot Oil…)
IMAG2217

Exfoliate Face Mask Mixture

IMAG2216

Coffee grounds

IMAG0299

Green Bean Powder

Instructions for Face exfoliator:

Step 1: Mix all ingredients together

Step 2: Apply the mixture onto your face

Step 3: Massage gently and leave it on for around 10 mins or until it is dried

Step 4: Rinse with warm water and massage gently

Step 5: Rinse with cool water and apply your daily skin care products

IMG-20130506-WA0006

Me with the coffee grounds exfoliation mask

Instructions for Body Scrub:

Step 1: Mix all ingredients together

Step 2: Apply the mixture onto your body or any parts of your body with cellulites

Step 3: Massage gently and leave it on for 10 mins

Step 4: Wet yourself under the water and scrub gently until the scrub are washed off

Under-eye circles Mask

I have dark circles for more than 10 years and it’s bothering me. I am trying this recipe and it has immediate result after I used it. Although caffeine cannot completely clear dark circles, it can reduce the puffiness and inflammation associated with dark circle.

This is somehow similar to the tea bags eye mask idea, since tea and coffee both contain caffeine.

Instructions for Dark Circle Mask:  

Step 1: Steep coffee grounds in water until water turns dark (using cold water can help tightening the skin)

Step 2: Filter the coffee water

Step 3: Wet cotton pads with coffee water

Step 4: Apply cotton pads on under eye area for 5 minutes.

Step 5: Wash away the remaining coffee water if there’s dark water remain on your face. Use both morning and night to receive the greatest benefit from this natural beauty treatment.

Except our skin, Coffee grounds can also be used in the below ways!

Natural Fertilizer:

Mix with soil or just add it on top of the soil as a natural fertilizer for plants

Natural Deodorizer:

Except baking soda, coffee ground is also a natural deodorizer. Just simply place used coffee grounds in your fridge or shoes.

Hair Shine Solution:

You can add coffee grounds in your hair mask or replacing with coffee water in your DIY Shampoo solution!

Sprinkle around areas where pesky insects, slugs and snails dwell to drive them away

Dye clothing or paper

Rub into your dog as an organic flea dip

Hope both of you and your skin, even your garden, your dog can enjoy the benefits from the delicious coffee!

DIY SHAMPOO & CONDITIONER

I would like to share my DIY shampoo experience for the past nine months with you today. Some people think it’s weird, some of them think it’s cool, the others think I am a Hippies, but this is just one of my little steps for trying to get closer to mother nature and doing things that benefit both myself and the Earth God has been provided us.

And the story started with my old favorite section in the groceries stores……

Shampoo and Conditioner Section!!!!

I liked trying different brands and types of shampoos and conditioners, and my dream was having shiny and silky hair!!!!

I liked the FOAM! The foam from the shampoo made me feel refreshing and clean, and seems like they suck up the oil from my hair and make it silky and shiny.

But the TRUTH is…NO!

FOAM is not as refreshing and as clean as we think. Most of the hair products contain a lot of chemicals and most of the brands tested on animals…FOAM is produced by different kinds of chemicals.

So in conclusion…Silky and shiny image doesn’t equal to truly healthy hair.

Chemicals in shampoos control the produce of hair oil and make your hair rely on the shampoo and conditioner.

Our hair and scalp can produce and balance the oil by themselves!

By using natural products, hair will have the natural glow and health!

After knowing about these, I decided to make some changes on my choice on shampoo and conditioner.

I was introduced to the idea of going poo-less

The idea of no foam made me wondered, but there’s always no harm for trying new stuff, especially if it’s NATURAL and CHEAP!

There are many different ways to make your DIY shampoo, some people make it with Castille Soap so that they can still enjoy the foam, and some people make it as powder dry wash.

I have tried 3 different ways of making my own “Shampoo + conditioner solution” and I am doing it in a very CHEAP and EASY way.Image

All you need is Baking Soda and Apple Cider Vinegar/ Lemon juice/ Vinegar.

Recipe of the Shampoo:

1 table spoon of baking soda + 1 cup of water, shake well (some people found that using hot water is better)

I knew Arm and Hammer is the most common brand for baking soda, but just a heads up that Arm and Hammer is tested on animals. I used Red Bob mills baking soda because it is aluminum free and not tested on animals, but I switched to Whole Food brand because it’s cheaper, it’s also not tested on animals, but not aluminum free.

Some people use it all at once, but for lazy people like me…I keep it in a used toner bottle (and some people use ketchup and mustard squirt bottles) and this solution can be used for 2-4 times. (For people with short hair, I am sure they can use it for a longer time).

I heard that there’s a different between using hard water and soft water, since hard water contains minerals and minerals might remains in the hair, so people suggest using distilled water. But this is not my concern since I am using soft water at home.

I tried to add some scent into the shampoo solution but I found that the scent doesn’t really remain on the hair. I will let you know how to make your hair smell good later.

Recipe of the Conditioner

1 table spoon of Apple Cider Vinegar/ Lemon Juice + 1 cup of water

OR

¼ cup of vinegar

I tried both and I think it really depends on your hair condition. I found that Vinegar or Lemon juice works better than Apple cider vinegar for me. Since Apple Cider Vinegar makes my hair feel heavier.

Instruction:

1. Add the baking soda solution onto wet hair, rub it into hair and message the scalp, rinse it.

2. Apply conditioner solution (I tried to use spray bottle and sometimes I just pour the solution onto my hair), rub it into the hair and message the scalp, rinse it.

*and please avoid getting the solution into your eyes*

I can tell you it will cause eyes burn…even I didn’t take any test on neither animals nor human

3.1 I usually will apply a penny size of oil (it can be coconut oil, avocado oil, almond oil or any kind of oil) onto my wet hair after washing my hair, and especially on the tip on the hair to give it extra moist and prevent spite-ends.

Remember don’t be too greedy, cause extra oil can make your hair greasy!

If you are afraid that apply oil on washed hair will cause greasiness, here is another option for getting SILKY HAIR!

3.2 DO IT BEFORE YOU ARE PLANNING TO TAKE SHOWER OR WASH YOUR HAIR.

Apply a quarter size of oil onto your hair 15-30 mins before you wash your hair.

Wash it normally with step 1 and 2, but skip step 3.1

So…You want to know how to make your hair smells good and how to keep the scent in your hair?

Just a little trick on step 3!

I added a drop of essential oil of my choice (usually lavender) into the quarter size of oil!

4. You can either let the hair to dry naturally or blow dry it. I found that my hair feels lighter after blow drying.

Your hair might be heavier than before or having dandruff, it takes around a week for our hair to adjust to this natural solution. My hair was a bit heavier and thicker than before in the first week but I didn’t have dandruff problem, it really depends on each person’s hair condition.

I am now very satisfied with my baking soda + vinegar shampoo and conditioner solution because my hair is healthy, silky and I know they are happy because they don’t have to deal with chemicals anymore!!!!

DIY Laundry Powder

Happy New Year!!!

I have been lazy during the past few months updating the blog, but it doesn’t mean that I have been lazy about my GREEN project.

I hate doing laundry and folding clothes! But since August… laundry has become more fun for me!

And today I would like to share the DIY Laundry Powder I made last August (and I am still using the same bottle of laundry powder from August)!!!!

Washing clothes produce sewage with chemicals! And chemicals in laundry cleaning products (both powder and liquid) cause allergies.

I researched and read about DIY laundry powder recipes and always wanted to give it a try.

I found that there are two types of recipes on the Internet, they are basically using the same ingredients but with different perspectives.

  1. Economically Friendly
  2. Environmentally Friendly

Laundry powder is really easy to make, all you need are washing soda, borax, and a soap bar.

You can find washing soda and borax in the cleaning section in grocery stores, and you can use whatever soap bar you like.

For me, I chose to do it in an environmentally friendly way by using products from ethical companies!

Q: What is my definition of an ethical company?

A: Have responsibility to the environment and the society

     Not tested on animals

I was researching on the brands for borax and washing soda, and I found that Eco-Pioneer is a brand that produces all natural and non-animal tested products!

And I got soap from The Soap Shop.

You can find it in Healthy Food Stores, and thank you Julie for buying it for me!

IMAG0161

Ingredients:

  •  2/3 soap bar
    I got my soap with tea tree oil from The Soap Shop
    A lot of recipe online recommend using 1 soap bar, but I just use 2/3 which I think it is good enough
  •  1 cup Borax: Eco-Pioneer Pure Borax
  • 1 cup Washing Soda: Eco-Pioneer Washing soda
  • Essential Oil of your choice for scent (Optional)

Steps: It is very easy!

  1. ground the soap bar
  2. mix it with borax and washing soda
  3. add essential oil
  4. mix well

    IMAG0162

    Grounded soap bar

 And…It’s DONE!

What about Softener???

Do you know that softener is toxic to the environment?

And the softener paper is not recyclable and it contains a lot of chemicals which is harmful to the environment.

I found a very economically and environmentally friendly Softener. And it’s very easy to make:

Water + Vinegar

From the website I visited, they recommended 1 cup of water with 1 cup of vinegar.

I was worried that it will result in a very vinegary smell, so I changed the proportion to a 5:1 ratio, and put the mixture in a spray bottle.

(But I found out that vinegar won’t have any smell left after drying)

I just sprayed the mixture on top of the wet clothes in the dryer. And it was surprisingly successful! The clothes were soft and there were no vinegary smell.

If you really like a refreshing scent on your clothes, you can use a sock, roll it into a ball and sprinkle a few drops of essential oil at the toe area of the sock. Throw it into the drier with all your clothes! It is almost like a FREE DRYER BALL!

The DIY laundry powder and softener add a lot of fun and joy to the boring laundry life and I am enjoying it more than before.

Give it a try and let me know how you like it!

Reusable buddy # 2 Coffee Mug

When I was in university, I used to carry my traveling mug everywhere with me everyday because I felt guilty for using disposable coffee cups. It was too much trouble for me to carry it everywhere and I had to bring it home everyday to clean it and the mug was heavy.

I gave up after I graduated (since I didn’t have to stay in the library and study with coffee) and…I switched back to the very convenient paper cups ignoring all the facts I knew about the impact to the environment.

I always think that it is OK for people who don’t study the environment and don’t know anything about sustainability to not be concerned about the environment because they DON’T KNOW anything, But IF I am a person who studied environmental management, always saying something about saving the earth, but not really doing anything…I have a guilt that I am a very bad person who always talk about the environment but don’t make any effort (you can say “look green, but don’t act green”)

When I am at work, I have coffee almost everyday with a disposable paper cup. I think the problem was…I know paper cups are not good, but I am just too lazy to bring my own mug and wash it.

And I found that the reason I gave up in bringing my own cup is that I only bring my mug with me if I am on a trip or only if I remember, because it’s too heavy and too trouble to bring it with me.

I started feeling guilty again when I thought about this…I knew the bad impact of paper cups but I am still using it just because of my LAZINESS!

By knowing that if I buy one cup of coffee with disposable cup everyday, it will add up to 23 lbs of waste in the land field in one year……I would like to make a tiny step and SAY NO TO PAPER CUPS.

For people who don’t know Mr. Paper cup very well….

According to goinggreentoday.com:

  • 58 billion paper cups are thrown away every year
  • 20 million trees are cut down to be made into disposable paper cups, 12 billion gallons of water is used in the process
  • Disposable coffee cups with polyethylene wax on the inside are not recyclable.
  • Polystyrene has become a large problem for marine environments.
  • The material breaks down into small pellets that are mistaken for food by some marine life, such as birds and fish, often causing death.
  • Disposable coffee cups with polyethylene wax release methane (a greenhouse gas) as it decomposes.
  • Approximately 18% of the garbage we produce is from disposable containers, of which coffee cups represent a large portion.
  • Styrofoam cups degrade at a glacial pace. Even 500 years from now, the foam coffee cup you used this morning will still be sitting in a landfill.
  • Even cups made with recycled paper contain virgin paper, due to FDA regulations that don’t allow for 100% post-consumer paper in food containers…
  • Starbucks disposal cups only use 10% recycled materials, meaning the other 90% is virgin paper. Styrene, which is used to make polystyrene, is a possible human carcinogen.

I am not a hard-core environmentalist or activist, I just wanted to make little changes in my life to affect people around me and being nice to the mother earth.

Think about it…When we are taking a coffee break, Mother Nature needs to take a coffee cup break!
(Plus…Mother Nature and Mr. Paper Cup are not good friends)

So…here is my solution:

  1. Buy a reusable coffee cup that I really like so that I want to use it everyday and keep that at work.
  2. Use my traveling mug during weekend or whenever I don’t have to work.

I got this lovely double layers glass mug from Home Senses with $7!

I keep it at work, so I can bring it to get my coffee every morning! (and don’t have to bring it home and wash it)

It might be a little bit inconvenient, but every little steps counted to make a big different!

Hopefully I can substitute all the disposable containers one day…

and hopefully after reading all these facts and if YOU are one of the coffee/tea drinkers, you will think about getting a reusable cup!